Author: admin

  • Your First Theme Park Holiday Abroad: Tickets, Queues, Rest Days and Fun for Every Generation

    Your First Theme Park Holiday Abroad: Tickets, Queues, Rest Days and Fun for Every Generation

    A theme park can become the center of a memorable family holiday, but an international park visit is not simply a bigger version of an afternoon at a local fair. Tickets have conditions, popular rides may have height requirements, transport can be crowded, and the temperature inside a queue can be very different from the weather in a nearby city. The best experience is not necessarily the day when a group rides everything. It is the day when each person, from the youngest child to the oldest grandparent, has enough energy and opportunity to enjoy something worth remembering. This guide explains how to plan that day without making anyone feel rushed.

    At a glance

    • Pick rides and shows suitable for the whole group, not only headline coasters.
    • Read dated-ticket, height and access conditions before paying.
    • Plan meals and breaks to protect everyone’s energy.

    Choose the park for the people traveling, not its publicity

    Start with a realistic list of what your group enjoys. One traveler may want high-speed coasters, another may prefer dark rides or live performances, while a toddler may be happiest in a shaded playground. Inspect the official attraction directory and filter it by height, accessibility, intensity and indoor or outdoor location. A park famous for extreme rides can still be a poor choice for a group where most members do not want them. Conversely, a smaller park with shows, gardens and gentle attractions may deliver a fuller day with less walking.

    Before making a nonrefundable booking, compare the park's exact location, transport, opening dates and any special-event closures. A destination marketed under the name of a major city may be far outside its center. If the park includes separate gates, decide whether one day at each gate works better than switching constantly. Read recent operation notices from the operator rather than relying on an old visitor video.

    Understand dated tickets, reservations and park-hopping conditions

    Admission can involve a dated ticket, an undated voucher requiring a reservation, a multi-day pass or a hotel package. These products are not interchangeable. Check what happens if your travel date changes, whether an entry reservation is required, and whether admission is included for very young children. Some experiences, shows or seasonal events need separate tickets even when the main entrance is paid. Booking a promotional ticket only makes sense if the terms match your likely itinerary.

    Kissimmee Theme Park Fireworks Above Waterfront

    Park hopping sounds flexible, but walking or taking a shuttle between entrances may consume the best hours. For a first international visit, one gate per day often allows a calmer pace. Compare the total price for parking, train tickets, lockers and paid queue products. The apparent bargain can disappear once extras are included. Save the operator's confirmation and make a screenshot available offline in case mobile service fails at entry.

    Plan around height restrictions, fears and different stamina levels

    A child's height is a safety condition rather than an approximate age guide. Measure in shoes only if the park's published rules specify how height is checked, and never assume a parent can authorize an exception. Read the official restriction page for each priority ride. Some attractions also have seating, restraint or transfer requirements. A person who dislikes darkness, loud sound or spinning might find an apparently gentle ride uncomfortable, even when it has no minimum height.

    For a mixed-age group, create two short lists: experiences that everyone can share and optional attractions for people who want stronger sensations. Decide in advance where a nonrider can wait comfortably. A shaded stage show or relaxed lunch is not a consolation prize; it may be the highlight for a grandparent or child. Avoid letting the group's most adventurous member determine every hour of the day.

    Maps can make a park look compact, but queues, crowds, slopes and stroller detours turn short lines on a screen into long walks. Choose three must-do experiences, then group additional attractions by themed area. After each major ride, stay in the same zone for a smaller attraction, snack or show. Repeatedly crossing the park to chase a lower displayed wait often wastes more time than it saves, especially when published waits change while you walk.

    Arrive at a sensible time with admission ready, but do not rely on getting every headline ride immediately after opening. Some guests have early entry through hotels or specific passes. Use the official park app for operating times, show schedules and closures; have a printed or saved map as a backup. Add a meeting point that is easy to describe without needing an internet connection.

    Decide if express queues are worth paying for

    Paid priority access can help when there are only a few hours available, or when standing in queues is particularly difficult. It is not necessarily necessary on a quieter weekday, and it may exclude specific attractions, time slots or experiences. Study the exact product: some passes cover a fixed number of rides, some cover a limited selection and others require individual bookings. A pass that sounds unlimited may have important conditions in the small print.

    Compare the cost to the value of another park day. A family might spend less by choosing two relaxed days with ordinary admission rather than buying four expensive priority passes for one rushed visit. If a traveler requires disability-related queue support, investigate the park's separate access program rather than assuming a paid pass is the only solution. Accessibility systems usually require advance information and should not be confused with commercial upgrades.

    Roller Coaster In Theme Park

    Manage food, hydration, weather and sensory overload

    Hot pavement, crowded indoor spaces and excitement can make visitors forget to drink or rest. Bring refillable water containers where permitted, check drinking-water stations and plan a meal at an off-peak time. Review rules about outside food, baby supplies and medically necessary items. People with severe allergies should request ingredient and cross-contact information directly from food operators; a menu icon alone is not sufficient assurance.

    Pack sunscreen, a compact rain layer, and one dry change of clothes for children if water attractions are on the plan. Live entertainment may include sudden sound effects or flashing lights. Ear defenders, quiet indoor spaces and breaks away from the most crowded paths can help people with sensory sensitivities. When a child is tired, another ride is seldom the solution. A scheduled pause in a cool, seated area protects the rest of the afternoon.

    Check accessibility and daily movement before booking

    Accessible does not always mean effortless. Ask the park about entrance routes, accessible toilets, ride transfers, wheelchair storage, mobility-device charging and transport between distant zones. Some attractions permit visitors to remain in their chairs while others involve transfer or evacuation requirements. A person who cannot transfer safely should not count an attraction as available until its specific rules have been reviewed. Confirm that the official access guidance is current for the date of travel.

    Rental strollers and wheelchairs may be limited, may not be reservable and may not be allowed beyond park gates. Determine whether your own mobility aid or stroller can use the hotel shuttle, local train and entry screening. An accessible hotel room is only one part of the journey; the entire route from bed to park gate must work. Plan rest spots with seats and shade rather than relying on finding them spontaneously.

    Make family safety simple and practical

    With children, establish a clear meeting procedure before anyone becomes separated. Put a parent contact number in an appropriate card or wristband without displaying unnecessary private information. Tell children to approach identifiable park staff rather than leaving the park or following unknown people. Photograph the group's clothing that morning for your own reference, and agree which adult is responsible for each child when the party splits for rides.

    Stroller parking is not secure storage for valuable items. Carry essential documents, medication and phones with you, using ride lockers if required. Keep a small kit with bandages, wipes and required medication, and locate the first-aid point on the map. If someone feels ill, stop and use the park's health services rather than trying to preserve the schedule. Planning a comfortable exit is as important as planning the entrance.

    Stay nearby or sleep in the city?

    A hotel near the park reduces early-morning transfers and may make an afternoon rest possible. It can also be more expensive and less convenient for sightseeing, restaurants or an airport departure. Compare actual door-to-gate time, not a hotel description such as 'close to the park'. Look at the frequency, last service and accessibility of shuttles. Parking charges at a park resort can change the comparison if a rental car is involved.

    Theme Park Pirate Ship Ride At Sunset

    For a family with children who nap, the ability to return to the room may justify a higher nightly rate. Adults visiting several city attractions may prefer a well-connected hotel in town. If you book a park hotel package, verify which benefits are genuinely included, whether early access applies on your dates and whether the advertised attraction is open during your stay. Do not make the hotel decision solely for a character breakfast or one promotional perk.

    A two-day itinerary that avoids burnout

    On day one, arrive with three priorities and explore nearby attractions slowly. Schedule a proper lunch and an indoor show during the hottest or busiest period. If a child needs a nap or an adult needs a break, leave before exhaustion rather than waiting for the evening spectacular. A hotel near the gates makes this much easier. An early night can be a better investment than one last hour in a crowded queue.

    On day two, repeat the experiences the group loved and try a few attractions missed previously. Allow extra space for shopping or photographs only after the main activities. A traveler who cannot walk long distances might prefer a later start and a short focused visit. If there is only one park day, save another full day of the holiday for a calmer city, nature or museum experience. Variety often makes the memories richer.

    Frequently asked questions

    Is a theme park suitable for a baby? Some parks have quiet paths, baby-care rooms and gentle experiences, but the usefulness depends on stroller access, weather and the family's routine. Check facilities before booking.

    Do height restrictions change by country? They can differ by attraction and operator. Always use the official rule for the specific ride, not age-based internet summaries.

    Should everyone buy an express pass? Not automatically. Compare actual coverage, cost and likely crowd levels, especially if some travelers will ride very little.

    Are parks accessible for wheelchair users? Many offer facilities and access programs, but ride-by-ride transfer and evacuation requirements differ. Request precise information in advance.

    How many days do first-time visitors need? One relaxed day can be enough for a smaller park; larger multi-gate resorts often reward more time. Decide based on the group's interests and stamina rather than completionism.

    Planning checklist

    FocusWhat to confirmWhen
    TicketsDated entry, reservations, extrasBefore buying
    AttractionsHeight and access restrictionsBefore making priorities
    ComfortWater, shade, seating, quieter spacesBefore entering the park
    ReturnLast shuttle, exit point and meeting planOn arrival

    Official resources and further reading

    Check the latest local rules, opening conditions and applicable safety requirements with the operator or authority before travel.

  • Learning to Scuba Dive on Holiday: Training, Dive Centers and a Safer First Descent

    Learning to Scuba Dive on Holiday: Training, Dive Centers and a Safer First Descent

    The idea of breathing underwater can make a coastal holiday feel completely different. Scuba diving allows visitors to observe coral gardens, rock formations and marine animals in a slower, more immersive way than a quick surface swim. Yet a dive is not an ordinary boat excursion. It requires appropriate training, reliable equipment, medical screening and an operator who follows recognized safety practices. This guide helps a curious beginner decide whether to try an introductory program or a full certification during a holiday, while leaving individualized health decisions to qualified professionals. Nobody needs to dive to appreciate a marine destination, and an informed decision not to dive is just as valid as a successful first descent.

    Quick planning reference

    Decision What to check Useful action
    Dive center Instructor, training agency and emergency plan Request a written description
    Medical suitability Health questionnaire and dive-medicine assessment Never conceal a condition
    Return flight Surface interval and local expert advice Leave generous time after diving

    Introductory experience or certification course?

    A supervised introductory experience is designed to let a novice discover what scuba feels like under a qualified instructor’s direct control. It is not a diving license, and it does not authorize independent dives afterward. A beginner certification course is a more substantial commitment, typically involving theoretical learning, skill sessions in confined water and assessed open-water dives. Exact standards, minimum ages and prerequisites depend on the training agency and course; do not assume a resort advertisement describes the same qualification used elsewhere. Ask the center to identify the actual course, issuing agency and requirements in writing.

    If you are unsure whether you enjoy breathing through a regulator, begin with a short, properly supervised introduction rather than purchasing several days of training. You may love the quiet of the underwater environment, or you may find the mask and unfamiliar sensations uncomfortable. Neither reaction is a failure. Some travelers discover that guided snorkeling offers the nature experience they wanted with less equipment and planning. Companions can take different activities without dividing the whole holiday: a guided coastal walk or boat viewpoint visit can fit around a lesson.

    Certification is worthwhile when you expect to dive more than once, want transferable skills and can give the learning process proper attention. Avoid squeezing complex training between a long overnight arrival and a flight home. Knowledge development needs uninterrupted focus, and practical skills should not be hurried just to meet a departure date. A good instructor can explain how progress is assessed and whether additional lessons may be needed without promising a guaranteed pass.

    Choose a reputable center, not the cheapest package

    Ask about the training agency, instructor credentials, equipment maintenance, maximum student-to-instructor ratio, language of instruction and emergency procedures. Confirm the location of the nearest appropriate medical support and how staff would communicate with emergency responders. A friendly reception desk is pleasant, but the quality of the safety briefing and the willingness to answer questions matter more than marketing photographs. The center should explain what is included in the fee: learning materials, certification registration, equipment, boat transfers, local permits and any extra training sessions.

    Visit the premises if practical. Equipment should be stored cleanly, regulators and buoyancy devices should be checked, and cylinders handled by trained personnel. You do not need technical expertise to notice whether staff take questions seriously and run orderly briefings. If instructors dismiss safety concerns, refuse to describe emergency arrangements, or pressure guests to hide medical information, do not participate. A bargain that removes essential instruction or limits a student’s ability to stop is poor value.

    Pay attention to the dive sites proposed for the first sessions. A sheltered bay with controlled depth and good visibility is usually more suitable than an ambitious current-swept reef. Ask whether entry is from shore or boat, how waves affect boarding, and where an anxious student can pause. Some centers offer accessible instruction with specialized staff and equipment, but access must be discussed individually, including transfers, communication and emergency procedures. The same principle applies to older visitors: age alone does not decide suitability, and health and practical capability must be considered case by case.

    Medical screening is part of the booking decision

    Diving involves pressure changes and breathing compressed gas, so medical conditions or recent illness can affect safety in ways that ordinary swimming does not. Complete the operator’s health questionnaire honestly and obtain clearance from an appropriately qualified diving-medicine clinician if the answers require it. Never take an unfamiliar medication to suppress symptoms just to complete a planned dive. Sinus congestion, respiratory illness, some ear conditions and other concerns can make a descent unsafe; only a competent healthcare professional can assess individual risks. Do not rely on advice from social media or a resort salesperson to replace a medical assessment.

    Skills such as equalizing pressure in the ears, clearing a mask, recovering a regulator and controlling buoyancy must be learned with the instructor. Speak up at the first sign of pain or difficulty equalizing; forcing a descent can cause injury. Communicate before the lesson about vision, hearing, language, mobility, fatigue and any other need that may influence instruction. A good center adapts explanations when possible and will stop the session if essential conditions cannot be met safely.

    Never dive while impaired by alcohol or drugs, after a very exhausting journey or when unable to follow directions. If you feel uncomfortable underwater, use the signal taught by your instructor and follow the trained procedure rather than making a panicked ascent. Your first objective is controlled, confident skill practice, not reaching a famous depth or creating dramatic photographs.

    What a well-paced learning day looks like

    A sensible schedule begins with registration and equipment fitting, followed by an understandable briefing. In shallow or confined water, practice breathing, mask skills and buoyancy before progressing further under instructor supervision. There should be time between exercises for questions and feedback. On an open-water training day, transport, equipment setup, buddy checks, the dive itself and rest often take longer than the advertised time underwater. Do not plan a tight restaurant reservation or another activity immediately after every session.

    Bring drinking water, weather-appropriate clothing, sun protection, prescription medication and a snack that fits the operator’s instructions. If you are prone to seasickness, discuss appropriate options with a healthcare professional rather than experimenting with a sedating remedy before diving. Keep important belongings on shore or in a secure location arranged by the center. Underwater cameras can distract beginners who are still learning essential skills; first establish buoyancy and situational awareness. Photography becomes more rewarding once you can move without striking coral or disturbing animals.

    A beginner’s first descent may feel surprisingly busy: breathing through a regulator, monitoring the instructor, maintaining depth and noticing the surroundings all at once. Give yourself permission to move slowly. There is no prize for reaching the seabed before others. If you want a holiday that includes both study and relaxation, use free afternoons for short walks, light sightseeing and rest instead of stacking additional extreme activities onto the same day.

    Plan the time between diving and your flight home

    Flying after scuba diving can increase decompression illness risk because cabin pressure is lower than at the surface. Divers Alert Network provides commonly used minimum preflight intervals of at least 12 hours after a single no-decompression dive and 18 hours after multiple dives per day or on successive days; more complex dives require different, more conservative planning. These are risk-reduction guidelines, not a guarantee of safety or a personalized medical instruction. Longer intervals can provide additional margin, and relevant operator, training-agency and diving-physician advice must take precedence for your circumstances. The same issue may arise when ascending to high altitude by road after a dive.

    For a weeklong coastal holiday, it is often sensible to stop diving well before departure and reserve the final day for relaxing, sightseeing and packing. This leaves space for delayed lessons, rough-sea cancellations or simply recovering from a busy program. Do not book an extra dive at the last minute just because the weather is finally good if doing so would compromise the recommended interval. If you develop unusual symptoms after diving, seek urgent medical evaluation and tell clinicians about your dive history rather than boarding a flight and hoping they resolve.

    Check insurance carefully. Standard travel policies can exclude scuba, impose depth or certification limits, or omit specialized evacuation and hyperbaric treatment. Verify what is covered for the exact activity you are buying, including introductory programs and training. Keep the insurer’s emergency contact details accessible to your diving companions. Policies that look similar in a comparison table can have very different wording around medical transport.

    Protect the underwater world while learning

    Reliable buoyancy control protects marine environments as well as the diver. Practice staying clear of coral, never hold onto living reef structures and avoid lifting sediment with your fins. Do not chase turtles, handle sea stars, feed fish or pursue sharks for a dramatic close-up. Many responsible dive operators provide a marine-life briefing and explain how local protected-area rules apply. When in doubt, observe from a greater distance. The goal is to be a quiet guest, not an underwater performer.

    If a dive site is crowded, suggest a less congested location or a different departure time rather than contributing to pressure on a fragile reef. Take only photographs when allowed and leave natural objects where they belong. Underwater photography also has a safety cost: novice divers can lose awareness of depth, time and their buddy when focusing on a screen. A successful first course often ends with a few modest photographs and a much stronger understanding of the sea.

    Frequently asked questions

    Do I need to swim to learn scuba diving?

    Training programs normally require specific swimming or water-comfort abilities, with standards differing by course and agency. Explain your experience honestly and ask the center about eligibility before paying. Do not assume diving equipment makes basic aquatic skills unnecessary.

    Can children learn to dive on holiday?

    Some agencies offer age-limited junior programs with special restrictions. Minimum ages, depth limits, supervision and medical requirements vary. Confirm the actual training standard and whether the child genuinely wants to take part.

    How long does certification take?

    It depends on the program, preparation and student’s progress. Ask for the complete schedule, including theory, confined-water skills, open-water dives and a realistic weather contingency. Quality training should not be rushed.

    Can I dive the day before a flight?

    That depends on the dives and the remaining surface interval. Follow recognized diving medicine guidance and the instructions of qualified professionals; allow more time when possible. Never assume a short flight eliminates decompression risk.

    What if I feel frightened under the water?

    Signal the instructor and follow the practiced procedure. A responsible instructor should respond calmly, provide support and stop the session when necessary. Continuing simply to avoid disappointing others is not appropriate.

    Scuba training can become an unforgettable part of a trip when it is approached as a genuine skill rather than a souvenir experience. Select a conscientious center, allow time to learn, ask medical questions early and leave space after the final dive before traveling onward. The most meaningful achievement is returning from the water informed, safe and excited about the marine world.

    Official and specialist references

    Rules and availability may change. Check current official destination and provider information before booking or making health-related decisions.

  • Memphis in 4 Days: Music, Civil Rights History and Graceland Without Spending the Trip in the Car

    Memphis in 4 Days: Music, Civil Rights History and Graceland Without Spending the Trip in the Car

    If this stop is part of a wider journey, use Tennessee in 8 Days: Nashville, Chattanooga and Memphis for the broader planning decisions and this guide for the destination-level details.

    Quick trip summary

    • Ideal stay: 4 days for a first visit.
    • Best approach: one major experience per half-day, with at least one flexible block for weather, fatigue or transport changes.
    • Good for: first-time visitors, couples, families, senior travellers and independent travellers who prefer a realistic pace.
    • Main planning risk: treating map distance as if transfers, queues, terrain, heat and meals took no time.

    Is this the right trip for you?

    Memphis is one of the rare American cities where several globally important stories overlap within the same trip: blues, soul and rock ’n’ roll, the civil rights movement, Mississippi River commerce and a food culture with its own strong identity. The challenge is that the headline attractions are not all in one walkable district. Four days gives enough time to separate downtown history, music museums and Graceland instead of spending each afternoon zigzagging across the city.

    Memphis asks you to give some experiences your full attention. The National Civil Rights Museum and the city’s great music landmarks are not quick photo stops, and you will appreciate both more if you leave space to reflect and listen. Plan the four days around a few substantial visits, with neighbourhood time and good meals between them.

    Where to stay

    AreaWhy choose it
    DowntownBest for Beale Street, the National Civil Rights Museum, riverfront access and visitors who want to walk to evening entertainment.
    South MainHistoric character, galleries and easy access to the Civil Rights Museum, with a calmer feel than the busiest blocks of Beale Street.
    Midtown / Cooper-YoungGood for restaurants, local neighbourhood life and travellers with a car or ride-hailing budget.
    East MemphisQuieter, often easier for parking and families, but less convenient for first-time sightseeing without a car.

    Downtown or South Main works well if you want to walk to the riverfront and spend evenings near the music venues. Midtown may suit a quieter, neighbourhood-focused stay, but you will use transport more often. Compare parking costs, nighttime noise and the journey back after a show before choosing a hotel on room price alone.

    Look at the hotel’s position on the actual street grid, not just its distance from Beale Street. A short-looking walk can cross wide roads or leave the lively parts of downtown. If you are renting a car, ask about overnight parking; if not, check where a ride-hailing car can collect you after an evening out.

    Memphis Sun Studio Building

    How to get there

    Memphis International Airport is the main air gateway. Amtrak’s City of New Orleans route also serves the city, useful for travellers combining Memphis with Chicago or New Orleans. A car is helpful for some parts of the metro area, but ride-hailing can be simpler if your itinerary centres on downtown, Graceland and a few specific museums.

    After landing at Memphis International Airport or arriving by train, head to the hotel first and leave a proper buffer before any evening plans. You may be able to enjoy dinner or a little music downtown, but avoid making a timed tour your first commitment. Save your address and pickup point offline so arrival is straightforward.

    Getting around

    Downtown and South Main are walkable in sections, while Graceland, Stax, Midtown and other neighbourhoods require transport. Group attractions by area and avoid returning to the hotel between every stop. The historic trolley can be useful for some central routes, but it should supplement rather than define the entire plan.

    A Memphis day can disappear in car journeys if you keep switching between downtown, Midtown and the area around Graceland. Visit the National Civil Rights Museum while exploring South Main, and treat Graceland as a separate outing. For evening music, consider how you will return to the hotel, not only how you will get to the venue.

    A realistic itinerary

    Arrange the four days by neighbourhood rather than by a list of famous names. Give the first day to civil rights history and the riverfront, the second to downtown music, and another to Graceland. Keep Stax and Midtown flexible until you have checked tour times and museum opening days; the order can change without spoiling the plan.

    Day 1 – Civil rights history and South Main

    Begin at the National Civil Rights Museum and give it enough time; this is not an attraction to rush before lunch. Continue through South Main, then walk toward the riverfront for a lighter outdoor block. Keep the evening low-key or hear live music after a break.

    Day 2 – Sun Studio, downtown music and Beale Street

    Visit Sun Studio or another major music site early, then focus on the downtown cluster of music museums and Beale Street. Do not try to experience live music as a checklist of venues. Choose one or two places, listen properly and leave room for dinner.

    Day 3 – Graceland and South Memphis

    Make Graceland the anchor and allow for the time required by the ticket package you choose. Pair it with a stop that fits geographically rather than driving back and forth. If Stax Museum is a priority, check hours and consider visiting it on this day or the next depending on timing.

    Day 4 – Stax, Midtown and food-focused Memphis

    Use the last day for Stax, Cooper-Young, Overton Square, Crosstown or another neighbourhood that shows the living city beyond the major historic sites. Finish with a barbecue or soul-food meal chosen for quality rather than fame alone.

    Memphis Streetcar On Main Street

    On the final day, choose between more music history at Stax and a slower wander through Midtown, rather than trying to cover every neighbourhood mentioned in the guide. Leave enough time for a barbecue lunch and the trip back to the airport or station. Memphis is better enjoyed listening to something than watching the clock.

    How many days do you really need?

    If you have three days, I would keep the National Civil Rights Museum, a strong music-focused day and Graceland if Elvis’s story interests you. With five days, spend longer in Midtown or add another museum without squeezing it beside a big tour. There is no need to tick off every studio and stage to understand why Memphis matters.

    Four days work well because Memphis has two strong strands to explore: the history of civil rights and a remarkable musical heritage. Give each its own time, then use the remaining hours for the riverfront and local neighbourhoods. A rushed two-night visit can be enjoyable, but you will make tougher choices about what to leave out.

    Best time to visit

    Spring and autumn are popular for comfortable temperatures and events. Summer is hot and humid, so midday museum time becomes valuable. Winter is quieter and can be good for lower hotel rates, though some outdoor experiences feel less appealing in cold or wet weather.

    Summer heat and humidity make long riverfront walks more tiring than they look on paper. Spring and autumn often feel easier, though festivals and popular weekends can affect hotel availability. Before choosing dates, look at the performances or events you hope to attend; a live-music night may matter more to your trip than a small difference in temperature.

    What deserves advance booking?

    Graceland ticket packages, major music events and popular weekend hotels should be booked early. Timed tours such as Sun Studio can also sell out. Many museums are easier to fit around those fixed reservations, so anchor the itinerary with the attractions that have limited entry times.

    Graceland and timed studio tours deserve the first place in your booking plan, especially on a busy weekend. Once those times are set, fit museums and neighbourhood walks around them. Leave some room to change your evening music choice when you see what is actually playing; a full calendar of prepaid activities can make the city feel strangely rushed.

    Food and drink

    Memphis barbecue is famous, but the city’s food identity is broader than ribs. Try different styles across several meals rather than turning one heavily promoted restaurant into a pilgrimage. Soul food, modern Southern cooking and neighbourhood cafés deserve space too. Reservations help for higher-end weekend dining.

    A leisurely meal fits naturally between a museum and a night of live music. You might try barbecue one day, soul food another and a casual neighbourhood café when you want something lighter. Check kitchen hours before a late show, and tell the restaurant about allergies rather than assuming every sauce or side dish has an obvious ingredient list.

    Families, senior travellers and mixed-age groups

    Families can mix music, riverfront space and interactive museums, but long historical museums may require breaks for younger children. Senior travellers should choose a central hotel with easy parking or ride-hailing access and avoid scheduling Graceland plus multiple large museums on the same day.

    Children may enjoy the music and open spaces along the riverfront more than a full day of serious museum galleries. Plan a shorter museum visit with a break if you are travelling with younger family members. Older visitors may prefer to spread Graceland and the larger museums across separate days, with a ride rather than a long walk between stops.

    Memphis Pyramid Arena At Sunset

    Accessibility

    Major Memphis museums provide visitor-access information, but do not assume every part of an older building or music venue is equally easy to navigate. Check entrances, seating and the availability of lifts or accessible facilities before buying a timed ticket. Downtown pavements and busy roads also deserve a look when planning a route for someone with limited mobility.

    Budget: where to spend and where to save

    Admission to several major attractions adds up quickly. A city pass or bundled ticket may help only if you genuinely want everything included. Spend on the essential music and civil-rights sites, then use the riverfront, neighbourhood walks and live-music planning to balance the budget.

    Tickets for Graceland, studios and museums can add up, so decide which stories you most want to follow before purchasing a bundle. A downtown hotel may cost more but reduce transport after evening performances. Free time by the Mississippi and a few carefully chosen music venues can balance a day with a larger admission charge.

    Safety and practical awareness

    Memphis has neighbourhood-by-neighbourhood differences, so ask your hotel about current local conditions and use normal urban precautions, especially late at night. Ride-hailing can be sensible after evening music. Do not judge the whole city by isolated warnings, but do not ignore local advice either.

    Keep a copy of your bookings and the address of your hotel on your phone. After a late set on Beale Street, choose a sensible route home or arrange a ride instead of wandering into unfamiliar streets. Check current local advice with your accommodation, particularly for evening plans, and keep usual precautions in mind without letting them overshadow the visit.

    One day trip or regional extension

    Many visitors continue to the Mississippi Delta, Oxford or another Tennessee destination rather than taking a formal day trip. If you only have four days, Memphis itself is the priority. Add an excursion only if you have already protected the city’s core history and music sites.

    The Mississippi Delta is tempting if the blues is what brings you here, but a trip out of the city takes more time than a quick glance at a map suggests. If you are already driving towards another destination, build it into that journey. Otherwise, use your four Memphis days to explore the music and civil rights history already close at hand.

    How to handle bad weather or extreme heat

    In the heat, make the riverfront walk an early or late activity and spend the hottest hours inside a museum. When rain rolls in, a music exhibit, studio visit or long lunch offers an easy alternative. Keep any outdoor riverside plan flexible; there is no reason to cross the city in poor weather simply because a schedule says you should.

    Solo travel

    Memphis can be rewarding on your own, especially if you love museums and live music. A central hotel makes it easier to return between daytime visits and a show, and a guided music tour can be a pleasant way to meet fellow travellers. For late evenings, know your ride-home plan before the last performance ends.

    Evenings and nightlife

    Give yourself a proper night on Beale Street rather than hopping from door to door just to say you have been everywhere. Listen to a whole set if the music grabs you, and check cover charges or age policies before going in. On another evening, a quieter restaurant or neighbourhood venue may suit you better than the crowds downtown.

    Memphis Pyramid And Downtown Aerial

    Photography without turning the trip into a photo shoot

    The riverfront looks especially striking in the softer light, while old storefronts and music signs give downtown its character. At the National Civil Rights Museum and other sites tied to painful history, follow the photography rules and read the interpretation before taking pictures. These places deserve more than a quick image for a travel feed.

    Shopping and souvenirs

    A record from a local music shop or a book about Memphis history will often mean more than a generic souvenir. Give independent stores a little time, and ask staff about local artists if you are curious. Protect vinyl and other fragile purchases on the flight home, and remember that a good live performance is also something worth taking away.

    What to pack

    Pack comfortable shoes for museum floors, South Main walks and evenings on your feet at music venues. In summer, light clothing and water are useful even when the day’s plan seems mostly urban; in cooler months, bring a layer for the riverfront after dark. Keep your day bag small enough to handle easily in busy rooms and shows.

    Common planning mistakes

    Do not schedule the National Civil Rights Museum as a rushed stop between Graceland and a studio tour. Each is worth more time, and they are not all next door to each other. Another easy mistake is treating an evening of music as a short final appointment; it is often the part of the day you most want to linger over.

    Leave one museum or neighbourhood as an optional extra rather than a promise. A tour can run longer than you expect, or you may find a live act you want to stay for. When that happens, you should be able to enjoy it without worrying about the next drive across Memphis or a dinner booking you can no longer make.

    Practical habits that make the trip easier

    • Save offline maps and the exact names of stations, terminals, hotel entrances and meeting points.
    • Carry a small amount of local cash even when cards are widely accepted.
    • Check the last practical return option before starting a day trip.
    • Download tickets and booking confirmations before leaving reliable Wi-Fi.
    • Separate one payment card from your main wallet and keep backup contact details offline.
    • Recheck weather, transport notices and opening hours on the morning of any fixed excursion.

    Official information to check before you go

    Opening days, transport, weather-sensitive access and event schedules can change. Recheck the details that control fixed reservations shortly before travel, especially during public holidays, major festivals or severe weather.

    Final planning checklist

    • Confirm passport, visa, entry and transit requirements for your nationality.
    • Choose accommodation by the journeys you will repeat, not by price alone.
    • Reserve only the attractions or excursions that genuinely control the day.
    • Save offline copies of tickets, hotel details, insurance information and essential addresses.
    • Check the exact airport, station, bus terminal, ferry pier or pickup point before arranging transfers.
    • Keep one flexible half-day for weather, fatigue or something discovered after arrival.
    • Recheck official opening information and local transport shortly before each fixed day.

    Final thoughts

    Memphis is most memorable when its history and music are given room to breathe. Spend time with the stories at the civil rights sites, listen closely in a music venue and sit down for a meal that belongs to the city. The best four-day visit is not a collection of famous names; it is one that helps you understand why they matter.

  • First Ski Holiday Abroad: Lessons, Equipment, Resort Choice and Safer Days on Snow

    First Ski Holiday Abroad: Lessons, Equipment, Resort Choice and Safer Days on Snow

    A first ski holiday is memorable for the quiet moments as well as the first successful turn: snow falling outside the window, a warm lunch after lessons, a mountain view from the lift and the surprise of discovering a new physical skill. But skiing also involves genuine cost, cold, unfamiliar equipment and the possibility of injury. For beginners, the smartest destination is rarely the resort advertising the most difficult slopes or the biggest lift network. It is a place with reliable beginner instruction, manageable access, a comfortable base and non-ski activities for anyone who wants to rest. Families, adult beginners and older travelers can all enjoy the mountains when the schedule allows learning at an individual pace.

    At a glance

    • Check exact conditions before booking, rather than relying on a universal rule.
    • Choose arrangements that work for the ages, abilities and interests of your group.
    • Keep a practical alternative in case prices, weather or access change.

    Choose a beginner-friendly resort, not merely a famous one

    Look beyond the number of piste kilometers. Ask whether the learning area is near the accommodation, whether nursery slopes are served by easy lifts, and whether lessons meet at a convenient location. A huge ski domain may offer spectacular terrain but require transfers just to reach the beginners’ zone. Check published piste maps, local snow reports, lesson availability and lower-elevation weather risks. A smaller resort with a gentle practice slope and welcoming instructors can be a much better first experience.

    For families, confirm the age accepted by ski schools and whether a children’s snow garden is included. For people who are not comfortable walking long distances in ski boots, ask how far equipment storage is from the lifts. An appealing hotel across a steep icy road may be unsuitable despite an excellent room price. Judge the entire morning journey from breakfast to the lesson meeting point before booking.

    Snowy Mountain Ski Resort And Chairlifts

    How many days to allow for lessons

    Most beginners benefit from structured instruction early in the holiday rather than trying difficult slopes after watching online videos. Group lessons offer social motivation and a lower cost per person, while private lessons can address specific fears, a limited schedule or adaptive techniques. Check instructor qualifications, language availability, maximum group size and the precise duration. A lesson advertised as a half day may include breaks and lift transfers, which affects how much on-snow practice you receive.

    Avoid booking the entire week as a competition to progress. Two or three well-paced learning days with time to rest may feel more rewarding than pushing through exhaustion. Children may need shorter sessions and breaks before they become cold or discouraged. Adults should not assume they will learn more slowly or quickly than someone else based on age alone. Comfort, health, previous balance skills and instruction all affect the experience.

    Ski equipment and boot fitting

    Beginners generally do not need to buy skis before their first trip. Renting lets an equipment professional select suitable skis, poles and boots for the current ability level. Poorly fitting boots can ruin a holiday, so try them on with proper ski socks, describe any pressure points and ask for adjustment before leaving the shop. Boots should feel secure without creating sharp pain or numbness. Do not wear multiple thick socks to fix the wrong size.

    Choose a helmet appropriate for skiing and check that it fits correctly; protective equipment reduces some risks but cannot eliminate them. Gloves or mittens, waterproof outer layers, eye protection and sun protection matter too. Layer clothing so you can adjust to weather and activity. If traveling by air, weigh the cost of bringing personal equipment against renting locally, including airline sports-baggage charges and the effort of transporting a ski bag through stations.

    The real cost: lessons, passes, rentals and food

    A ski package can include some but not all of the important elements. Make a budget line for accommodation, transport, lessons, rental gear, beginner lift access, winter clothing, insurance and meals. Verify whether ski school includes a lift pass or whether a cheaper learner ticket is available for a limited area. Paying for a full-area pass when you only use one nursery slope may waste money. Conversely, a cheap accommodation offer far from the lifts can add costly shuttle journeys or parking fees.

    Consider an illustrative two-person comparison: Resort A costs more per night but has lessons, rental and a beginner slope within a short walk; Resort B has a cheaper room but requires a car, paid parking and a lengthy daily transfer. Write the actual amounts beside each item before deciding. Do not infer that meals at a mountain restaurant will cost the same as groceries at home. Bringing water and a simple snack can improve comfort without requiring a complicated packed lunch.

    Mount Fuji Above Snowy Ski Slope

    Weather, snow conditions and visibility

    Snowfall alone does not guarantee good skiing conditions. Strong winds can close lifts, while freezing rain, very hard snow or dense cloud can make easy slopes difficult. Read the resort’s official daily lift and piste updates and follow closures, even when the view from the village seems pleasant. Beginner areas at lower elevation may have different conditions from upper mountains. Choose flexible lesson or rental arrangements where available so a disrupted day does not consume the whole budget.

    Pack for strong sunlight reflected by snow as well as cold. Sunglasses or appropriate goggles should fit securely. Protect exposed skin and apply sunscreen as directed, particularly at altitude. Dress in layers that keep moisture away from the body; sweating heavily during the first run can leave someone cold on the lift. When a child complains of wet gloves or cold feet, treat it as useful information rather than a sign that they need to try harder.

    Understand slope signs and the skier responsibility code

    Color grading varies somewhat across countries; an easy run on a resort map is not a promise that every section will feel effortless. Beginners should ski only within their control and instruction level. Common mountain safety codes require skiers to stay in control, respect people downhill, stop where visible and follow signs and closures. Ask the instructor which local rules apply. Do not enter closed terrain, jump barriers or follow someone off piste because the fresh snow looks inviting.

    Learning to stop and turn safely comes before speed. A helmet does not make risky behavior acceptable. If a slope feels too difficult, stop in a safe visible location and request assistance rather than accelerating to escape a problem. When starting downhill, look uphill for approaching people. Adults supervising children should make clear where the group will meet and what to do if someone becomes separated.

    Ski lifts and getting on or off safely

    Different lifts require different skills. A beginner may start with a magic carpet or gentle surface lift before using a chairlift. Pay attention to staff instructions on approaching the loading area, securing equipment and exiting at the top. If someone needs additional time due to disability, age or anxiety, tell the operator before boarding. Lift attendants can often explain the procedure or direct travelers to appropriate assistance, though arrangements depend on the resort.

    Ski Gondola Over Snowy Mountain Resort

    Never try to rescue dropped equipment by jumping from a chair. If a lift stops, remain seated and wait for instructions. Children must follow the area’s height and supervision rules; do not assume an adult can place unlimited small children on one chair. Learn how to lower and raise a safety bar where required and avoid loose straps or clothing becoming entangled.

    A family plan without pressure

    For children, set success goals such as becoming comfortable in boots, using the practice lift and learning to stop. Schedule meals and warmth breaks before everyone becomes tired. Teenagers may progress at a different pace from younger siblings; avoid sending a beginner onto terrain chosen for an advanced family member. If adults and children book different lessons, identify a meeting place away from busy lift exits and exchange emergency contacts.

    Not everyone needs to ski. A resort with scenic walks, sledding where permitted, cafés, swimming facilities or cultural sights can provide enjoyable days for grandparents, toddlers and relatives with mobility limitations. Check accessible winter paths rather than assuming a village pavement remains clear of snow. A satisfying family holiday includes people who opt out of lessons without treating them as an inconvenience.

    Adult beginners and older travelers

    Starting skiing as an adult is common, but fitness, balance, pre-existing injuries and personal confidence vary. A traveler with medical concerns should ask their clinician about strenuous activity rather than relying on a generic age cutoff. A gentle lesson can help build skills progressively. Flexibility to stop after an hour, take a full rest day or replace skiing with a scenic excursion is a strength of good planning, not a failure.

    Older beginners may prefer private lessons or very small groups, nearby accommodation and equipment storage without stairs. Consider the grip of footwear on icy sidewalks and the availability of handrails outside the slopes. Skiing can be demanding on knees and muscles, so allow recovery time. Warm, accessible lodging is often a better investment than an ambitious mountain itinerary.

    Insurance, emergency contacts and mountain boundaries

    Standard travel insurance does not always include recreational skiing, off-piste activity, rescue services or helicopter evacuation. Examine policy wording for winter sports, altitude limits, equipment loss, liability and medical treatment. Understand how to contact local ski patrol and what information they will ask for if an incident occurs. Keep a charged phone in an inside pocket where possible and store the resort’s emergency number offline.

    Many resorts distinguish patrolled marked pistes from uncontrolled backcountry terrain. A traveler who follows a closed track or goes beyond the ski area may face substantially different risk and insurance coverage. Stay with authorized instruction and permitted slopes on a first trip. If severe weather or illness changes the plan, review refund rules for lessons and passes before deciding whether to continue.

    Two Women In Winter Clothes At Ski Resort

    A four-day beginner itinerary

    On arrival day, settle into accommodation, collect equipment and walk to the lesson meeting point while it is quiet. Day two can focus on the first beginner lesson and a relaxed afternoon exploring the village. Day three allows another lesson and repeat practice only on suitable terrain, followed by a proper rest. Day four might combine a shorter instruction session with a scenic lift ride or non-ski excursion if weather and skill level permit. Extend the program only when everyone feels comfortable.

    This approach intentionally avoids promising a particular ability by the end of the week. Snow quality, teaching conditions, stamina and individual learning all vary. If a person is not ready for a higher run, repeating the learner slope is sensible. Returning home with positive memories and safe habits is a much better goal than checking off an impressive piste number.

    Frequently asked questions

    Is one lesson enough to learn skiing?

    One lesson can introduce basic equipment, stopping and controlled movement, but progression varies widely. Booking additional instruction is usually wiser than assuming you can safely tackle larger slopes afterward.

    Should I buy a full-area ski pass?

    Not automatically. A beginner ticket or limited-area pass may fit the practice terrain. Ask the instructor or resort what access the lesson requires.

    Can grandparents enjoy a ski resort without skiing?

    Yes, if the resort has suitable lodging, transport and non-ski activities. Check winter accessibility, local weather and alternative indoor options before booking.

    Is ski insurance included in ordinary travel insurance?

    Not always. Read explicit winter-sports, rescue, liability and off-piste provisions, including exclusions for closed terrain.

    Do I need to bring my own skis on a first holiday?

    Usually renting is practical. It reduces transport burden and allows professional fitting, though travelers should check rental condition, prices and any insurance or damage terms.

    Quick comparison

    DecisionWhat to check
    Beginner terrainGentle practice area near lesson meeting point
    LessonsQualified instruction and realistic group size
    EquipmentProper boot fitting and protective clothing
    BudgetPass, gear, teaching and winter sports coverage

    Official resources and further reading

    Rules and availability may change. Check these sources and the relevant local operator before booking.

  • Flying With a Baby for the First Time: A Calm Guide From Booking to Landing

    Flying With a Baby for the First Time: A Calm Guide From Booking to Landing

    Flying with a baby for the first time can make even an experienced traveler feel like a beginner. You are planning around a person who cannot explain what feels uncomfortable, cannot carry a bag and may sleep at exactly the wrong time. The answer is not to predict every cry. It is to remove the problems you can solve before leaving home and accept that a slower trip can still be a wonderful trip.

    At a glance

    A realistic first-flight guide for parents traveling with a baby, covering safe seating, documents, feeding, airport routines, baggage and arrival-day plans.

    • Flight: Total door-to-door time, layovers, stroller policy
    • Seating: Airline-approved child restraint and seat position
    • Arrival: Car-seat transfer, cot confirmation, gentle first day

    This guide concentrates on the journey itself: deciding whether a flight makes sense, comparing infant ticket rules, choosing seating, packing a workable cabin bag, feeding during travel and designing a gentle first day. For the wider holiday, see our family-travel guide for different ages and the international-trip planning checklist. Rules for babies differ by airline, nationality, route and age; check the operator and authorities rather than relying on an old forum answer.

    Choose the flight around the whole journey

    A nonstop flight is often worth more than a superficially cheaper itinerary with a tight connection. Count time from your front door to the accommodation, not just hours in the air. A connection adds another boarding, another possible gate change and another period when your baby may need feeding or changing. If a connection is unavoidable, choose a comfortable buffer and check whether you must reclaim luggage or pass immigration at the intermediate airport.

    Departure time matters, but there is no universally perfect baby flight. Some babies settle on an evening service; others struggle after a disrupted bedtime. Start with your child’s usual patterns, then consider the arrival time. Landing late at night with a long transfer and no open food options may be harder than taking a daytime flight. A schedule that works for the adults also matters: exhausted caregivers find every small problem larger.

    Compare total costs. Infant fares, taxes, baggage allowances, stroller rules, seat selection and bassinet requests vary. A low headline fare may become poor value if the family must pay separately for hold luggage, adjacent seats and essential equipment. Ask the airline what is included for a lap infant versus an infant in their own seat, and keep the answer in writing.

    Decide on a safe seating and restraint plan

    A baby on an adult’s lap is allowed on many flights subject to airline and route rules, but permitted is not the same as safest. The US Federal Aviation Administration recommends that children under two use an approved child restraint system in their own airplane seat, particularly because unexpected turbulence can occur. Read the FAA’s guidance for flying with children and confirm your restraint, child size and seat position with the airline before paying for tickets.

    Do not assume a car seat approved for road use is automatically approved for aircraft use in every country. Check its certification label and the operating airline’s policy. If you plan to use a bassinet, remember that availability and weight limits vary and requests may not be guaranteed. A bassinet is not a substitute for appropriate restraint when the crew requires seats to be secured. An adult traveling alone with a baby should think through how to reach the toilet, collect food and handle a delay without help.

    The practical booking question is not simply “window or aisle?” It is whether the adult can reach baby supplies, whether a companion can help, whether the stroller can be used until boarding and how the child will be restrained during taxi, takeoff, turbulence and landing.

    Check baby documents before paying for nonrefundable travel

    International travel can require a separate passport for the infant, plus destination-specific visas or travel authorizations. Requirements depend on nationality and itinerary. Verify them through the destination government and the IATA Travel Centre, then check transit countries separately. Do not assume that being listed in a parent’s booking replaces the baby’s own documents.

    Where only one parent or guardian travels, some border authorities or airlines may request additional evidence of parental responsibility or consent. Requirements are not universal. Research the precise journey and carry relevant documentation where appropriate. If the child has a different family name, give yourself more time to identify what documents may avoid confusion at check-in or a border.

    For health preparation, discuss the destination and your baby’s age with an appropriate clinician before travel, particularly when routine immunizations, seasonal diseases, altitude, heat or local healthcare access might matter. The CDC’s guidance on traveling safely with infants and children offers useful questions to consider, although individual advice should come from a professional familiar with the child.

    Pack one small bag that works during a delay

    The best cabin-bag setup is not the most elaborate; it is the one another caregiver can understand in seconds. Keep diapers, wipes, changing mat, spare clothes for baby and an adult, small disposal bags, comfort items and feeding supplies in clearly separated pouches. Put a full change of clothes where it can be reached without removing every other object. Pack more essentials than the planned flying time suggests because airport delays and missed transfers are real possibilities.

    Check current airport and airline rules for liquids, expressed milk, formula, sterilized water and baby food. Screening exceptions and container rules vary by country and sometimes by terminal. You may need to present items separately. Never depend on an airline to supply a particular brand, size or quantity of formula. A lightweight blanket or familiar sleep item can help with comfort, but follow safe-sleep guidance and never use a loose item in a way that compromises safety.

    Airplane Landing Against Orange Sunset

    A useful test is to imagine the baby needs changing while the seat-belt sign is on, then the flight is delayed for two hours. What must be immediately available, and what can safely stay in a checked suitcase? That distinction creates an efficient bag.

    Use a simple airport routine

    Arrive with more margin than you would when traveling alone. Know whether online check-in is possible for the infant, whether documents must be inspected at the counter and where oversize or gate-checked equipment is accepted. Photograph the stroller and any car seat before handing it over; attach identifying details and keep any claim receipts.

    If two adults are traveling, divide responsibilities explicitly. One handles passports, boarding passes and the queue; the other concentrates on the baby and the accessible pouch. Switch roles when needed. If you travel alone, place tickets and phone somewhere reachable with one hand. Ask staff for assistance early rather than waiting until boarding has begun.

    Boarding first is not always the best choice. Extra time in a confined aircraft can make a restless baby more uncomfortable. If the airline offers family boarding, evaluate it against the child’s mood and whether you must install a child restraint. With two caregivers, one may board to arrange seats while the other stays with the baby until closer to departure, if airline procedures allow.

    Manage feeding, ears and sleep without forcing a timetable

    Offer feeding according to the baby’s normal needs, with attention to takeoff and descent if appropriate for your child. Sucking or swallowing may help equalize ear pressure, but it is not a guarantee and you should not force feeding when the baby refuses. Ask a pediatric clinician about ear problems or recent illness instead of improvising a treatment at the gate.

    Prepare to feed in the seat you have booked, respecting seat-belt and crew instructions. If you bottle-feed, check options for safe warming and water supply rather than assuming cabin staff can sterilize equipment. Keep food hygiene practical and conservative, especially on long connections. A familiar settling sequence—feeding, quiet voice, sleep sack if appropriate—may translate better than trying to reproduce the entire home routine.

    Sleep may be shorter or more fragmented. That does not mean the flight has failed. Alternate small tasks between caregivers, take breaks where possible and prioritize the baby’s immediate needs over entertaining the entire cabin. Most fellow travelers simply want clear, calm behavior from adults handling a difficult moment.

    Plan the transfer and first 24 hours

    Arrival is the part many families underplan. Before departure, decide how you will travel from the airport, whether an appropriate child restraint is required and supplied, and where you can obtain essentials near the accommodation. A promised taxi child seat should be confirmed, not assumed. If you bring your own restraint, confirm its compatibility and installation requirements.

    Choose accommodation for function before aesthetics: elevator or ground-floor access, reliable temperature control, space for a cot and room to prepare feeds or snacks. Ask whether a cot must be reserved and what bedding is supplied. A beautiful apartment up four narrow flights of stairs may feel much less beautiful with a stroller, luggage and a sleeping child.

    On arrival day, choose one gentle activity: a short walk, a grocery stop or simply time outside in a nearby park. Avoid prepaid timed attractions immediately after a long flight. For destination selection and pacing, our realistic itinerary-building guide explains why fewer commitments often produce better holidays.

    Common first-flight problems and realistic responses

    The flight is delayed: move supplies from the overhead bin to your day bag while you can, check where changing facilities are located and protect any essential medication or feeding items. The stroller does not appear at the aircraft door: follow the airport’s oversize-baggage procedure and ask staff where it will be returned. The baby cries during boarding: focus on needs rather than apologies; check temperature, feeding, a diaper change and whether your baby needs quiet or movement.

    An adult is overwhelmed: switch roles when possible. If alone, simplify; it is fine to stop trying to entertain and concentrate on one need at a time. The child sleeps through the planned sightseeing: keep the day flexible. The trip is not a competition to see everything, and sleep is part of the schedule now.

    A first-flight checklist you can actually use

    • Confirm infant booking, separate travel documents and transit rules.
    • Check seating and restraint approval with the airline, plus stroller and baggage policies.
    • Arrange a safe transfer and confirm any cot or baby equipment at the accommodation.
    • Put feeding supplies, changing essentials and spare clothing in reachable cabin pouches.
    • Allow generous airport and connection time, and keep the arrival day light.
    • Check destination-specific health advice with a qualified professional.

    Frequently asked questions

    Is flying with a baby easier before or after the first birthday?

    There is no universal easier age. Some younger babies sleep more, while some older babies tolerate routine changes better but need more movement. Choose based on the child’s health, travel duration, your support and your confidence in managing the full journey rather than an internet rule.

    Can I take a stroller to the aircraft door?

    Some airlines allow gate-checking; others require equipment to be handed over earlier, and the return point may differ by airport. Verify the exact arrangement for each operating airline and connection rather than relying only on the booking website.

    Should we book many activities on day one?

    Usually not. Immigration, baggage collection, transfers and feeding can make arrival unpredictable. Protect a few flexible hours, buy essentials and build your schedule around rest before adding timed visits.

    Do babies need their own passport abroad?

    In many international situations they do, but the precise documentation depends on the child’s nationality and route. Check each relevant government and airline before booking; a birth certificate alone is not a substitute for required travel documents.

    The most reassuring first flight is rarely the one where nothing goes wrong. It is the one where the adults have a few sensible options when something does. Leave room for the baby to be a baby—and enough room in the itinerary for everyone to enjoy the destination.

  • Florida Keys in 7 Days: Key Largo, Marathon and Key West Without Driving the Overseas Highway Twice a Day

    Florida Keys in 7 Days: Key Largo, Marathon and Key West Without Driving the Overseas Highway Twice a Day

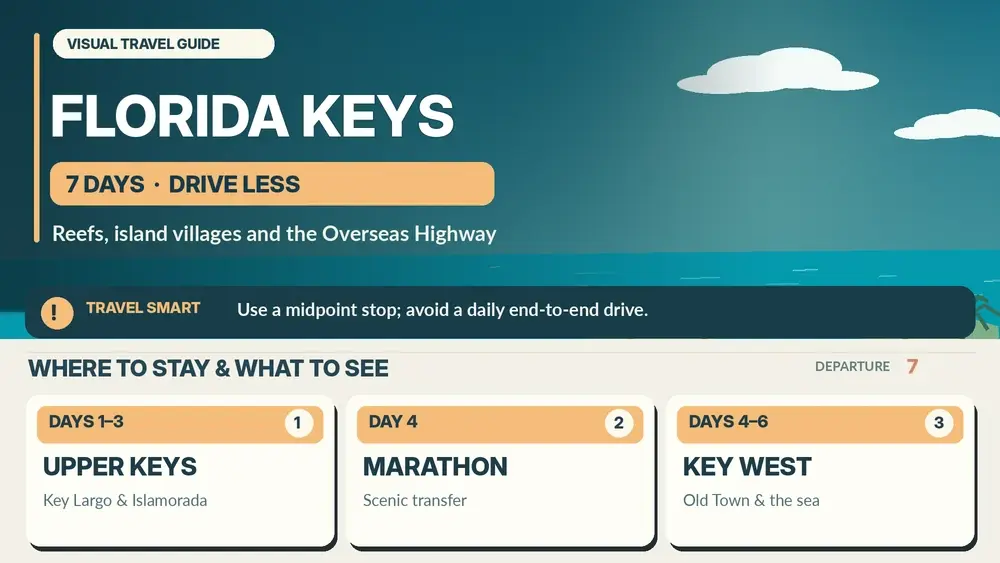
    The Florida Keys stretch for more than 100 miles below the mainland, and the Overseas Highway crosses 42 bridges. That makes the drive iconic, but it also means a Key West hotel is not a sensible base for daily reef trips in Key Largo or vice versa.

    This seven-day route uses two main bases: Key Largo or Islamorada for the Upper Keys and Key West for the Lower Keys, with Marathon as a deliberate stop or day rather than another compulsory hotel change.

    The official Florida Keys tourism site describes five distinct destination areas—Key Largo, Islamorada, Marathon, the Lower Keys and Key West—connected by the 113-mile Overseas Highway. The geography makes a one-way, two-base trip much more comfortable than constant backtracking.

    Quick trip summary

    • 3 nights Key Largo or Islamorada, 3 nights Key West, Day 7 departure.
    • Use Marathon and the Seven Mile Bridge area during the transfer rather than changing hotels again.
    • Book reef/snorkel trips with weather flexibility.
    • Avoid weekend/holiday drive assumptions based on empty-road map estimates.
    • Consider open-jaw flights or a final Miami buffer if the international flight is expensive to miss.

    Why this route works

    The Upper Keys provide the strongest reef/snorkelling/diving access and an easier first drive from Miami.

    Marathon naturally breaks the highway and offers wildlife/bridge/coast stops without requiring another checkout.

    Key West deserves several nights for history, walking, food and evenings when day visitors have left.

    A realistic itinerary at a glance

    Days Base Main focus
    1–3 Key Largo / Islamorada Reef, mangroves and Upper Keys
    4 Overseas Highway / Marathon Scenic transfer and Middle Keys stops
    4–6 Key West Old Town, history and flexible sea day
    7 Departure Key West flight or mainland return

    Day-by-day plan

    Day 1: Miami to Upper Keys

    Collect the car and drive south without turning every roadside attraction into a stop. Check in before dark and use a waterfront dinner as the first Keys experience.

    Day 2: Reef or marine day

    Choose snorkelling, diving, glass-bottom boat or eco-tour according to swimming ability. Weather and sea conditions should decide whether the trip goes ahead.

    Day 3: Islamorada/Upper Keys

    Use mangroves, paddling, fishing culture, galleries or a slower beach/water day. The official tourism site distinguishes Islamorada’s boating/fishing identity from Key Largo’s reef gateway role.

    Day 4: Drive to Key West via Marathon

    Stop in Marathon/Seven Mile Bridge area and perhaps one Lower Keys nature stop. The Overseas Highway is the day’s scenic spine; do not try to visit every key.

    Day 5: Key West history and walking

    Leave the car parked and use Old Town, Hemingway/Truman-style history, architecture and waterfront areas on foot or local transport.

    Day 6: Key West flexible day

    Choose a responsible boat/snorkel trip, Dry Tortugas planning if it is a true priority and booked, beaches or another historical/cultural day. Do not book the whole day around sunset.

    Illustrated Florida Keys route from the Upper Keys through Marathon to Key West

    Day 7: Departure

    Fly from Key West if the ticket works or drive north with a major buffer. A Key West–Miami airport drive is not a local transfer and traffic incidents can erase optimistic timing.

    Where to stay and how many hotel changes to make

    Key Largo is practical for reef access; Islamorada feels more spread out and relaxed.

    In Key West, paying for walkability can save parking and make evenings much easier.

    One Upper Keys base plus Key West is enough for a week; Marathon works naturally as a transfer stop.

    On a multi-base trip, location matters more than a small difference in nightly price. A room that removes repeated transfers can add more value than a prettier property that forces extra driving or taxis every day.

    Read recent guest reviews for practical details that booking photos rarely show: stairs, lift size, road noise, parking access, breakfast hours, room ventilation and the final walk from transport.

    Transport: what is worth planning in advance

    A car is useful for the Upper/Middle Keys and highway transfer, but mostly unnecessary once parked in central Key West.

    There is essentially one main road, so accidents and peak traffic can have disproportionate effects.

    If returning to Miami for a flight, consider a mainland final night when the ticket is costly or departure is early.

    Measure every move door to door rather than by the headline journey time. Checkout, reaching the station or airport, waiting, luggage and the final connection to the next hotel can turn a short transfer into half a day.

    Use inflexible tickets only when the saving is meaningful and the day is genuinely fixed. Weather-sensitive road, ferry and outdoor plans benefit from flexibility.

    Food and daily rhythm

    Seafood, Cuban influences and casual dockside meals fit the route naturally.

    A famous Key West dinner is more enjoyable when you are not hunting for parking at the same time.

    Use meals to control the rhythm of the day. A long regional lunch can be an experience and a recovery period, especially after hiking, museums, boat trips or an early start.

    Do not make every meal another attraction. Mix local specialties with simple food so that the destination, not the restaurant schedule, remains the centre of the trip.

    Families, children and older travellers

    Glass-bottom boats, aquariums/wildlife centres and shallow-water experiences can suit non-swimmers.

    Older travellers should ask about boat boarding and sun exposure.

    Key West walking days reduce the car-seat/parking cycle for families.

    For multigenerational travel, the useful pace is the one at which the least mobile member still enjoys the day. That usually produces a better experience for everyone.

    Children often respond better to a change of format than to another famous sight: a beach after a museum, a ferry after a city walk, or wildlife after a road day.

    Budget: where the money really goes

    Keys accommodation is often expensive; two bases reduce cleaning/parking/check-in costs.

    Marine activities are the main splurge, so choose one excellent reef day rather than paying for similar boat trips repeatedly.

    Compare total trip cost rather than headline prices. Parking, transfers, luggage, tours, resort fees and time lost reaching a remote hotel can erase an apparent saving.

    The best splurges usually remove friction: a central room, a safe private transfer, a direct train or ferry, a guide where context matters or one extra night that prevents an exhausting move.

    Best time to go

    Heat, thunderstorms, hurricane risk and winter cold fronts can all affect water plans.

    Sea conditions matter more than sunshine alone for snorkelling and boats.

    Shoulder season often balances weather, demand and prices well, but ferries, mountain services, rural restaurants and scenic roads may operate less frequently.

    Heat, rain, wind, snow and daylight should change the order of a day. Use comfortable hours for exposed outdoor sights and keep lower-effort alternatives available.

    Comfort, accessibility and realistic pacing

    Three nights in each main base make the highway a scenic transfer rather than a daily commute.

    Keep departure day conservative because one road connects much of the island chain.

    Travel fatigue compounds. One difficult transfer can reduce the quality of the following two days, which is why this route avoids one-night bases unless geography genuinely requires them.

    A free half-day is not wasted time. It is insurance for weather, laundry, a delayed transfer, a tired child or a place you discover only after arrival.

    Small decisions that improve the trip

    Use two bases

    Upper Keys and Key West are far enough apart to justify the split.

    Make Marathon the transfer day

    It breaks the road naturally without another hotel.

    Park in Key West

    Walking is part of the experience.

    Protect the Miami flight

    Highway 1 does not offer many alternatives.

    What I would leave out on this length of trip

    Leave a full Everglades road trip for another segment unless you add several days.

    Skip driving Key West–Key Largo–Key West for attractions on consecutive days.

    Mistakes that make this trip harder than it needs to be

    • Using Key West as the base for the whole chain.
    • Underestimating traffic on the one main highway.
    • Booking water trips with no weather backup.
    • Paying for a car that never moves in Old Town.
    • Treating Marathon as only a gas stop.
    • Driving directly to a tight Miami flight.

    How I would adapt the itinerary

    With four days, use Key West plus one Upper Keys night.

    With ten days, add a mainland Everglades section or more slow Keys time, not more hotel changes.

    Before booking

    • Book reef trips with cancellation policy.
    • Check hurricane-season insurance.
    • Plan Key West parking.
    • Keep road-trip fuel/water stocked.
    • Protect the final flight.

    Practical questions

    Key Largo or Islamorada?

    Key Largo is strongest for reef access; Islamorada is excellent for a laid-back boating/fishing atmosphere.

    Do I need a car in Key West?

    Not if you stay centrally; walking, bikes and local transport are often easier.

    How long does the Overseas Highway take?

    The pure drive is only part of the story. Traffic and scenic stops make it a real travel day.

    Final thoughts

    The Florida Keys are more enjoyable when the Overseas Highway is used as a journey once rather than a commute every day.

    An Upper Keys base and Key West give a week enough reef, road-trip scenery and old-town evenings without wasting hours backtracking.

  • Traveling in Extreme Heat: How to Plan Safer Holidays for Children, Adults and Older Travelers

    Traveling in Extreme Heat: How to Plan Safer Holidays for Children, Adults and Older Travelers

    A city that feels wonderful in spring can become exhausting during a heatwave. Long queues in unshaded streets, buses without reliable cooling and attractions reached by steep walks can make a carefully planned trip miserable or dangerous. Heat is not merely a comfort issue: it affects the body, and its risks are not equally distributed. Infants, older adults, pregnant travelers and people with certain medical conditions may need additional precautions.

    At a glance

    A travel-specific approach to extreme heat, from itinerary timing and shade to hotel cooling and age-sensitive precautions.

    What to check before booking
    DecisionWhat matters
    TimingWeather alerts and cool-hour sightseeing
    AccommodationDependable cooling and nearby transport
    AdaptationRest, water and age-sensitive planning

    This guide focuses on reducing exposure through travel planning, not on diagnosing or treating illness. Consult a healthcare professional about individual medical concerns, including how medication may affect heat tolerance. The CDC guidance for people at increased risk of heat illness explains why children and older adults deserve particular attention. Local health authorities and weather services should guide decisions during actual warnings.

    Check more than the average summer temperature

    Climate averages are useful when choosing a month, but they do not describe the temperature during a specific trip. Research the likelihood of heatwaves, humidity, nighttime temperatures and strong sun exposure. A destination with a moderate average can still experience dangerous conditions for several days. Check the official local forecast in the days before departure and each morning on location.

    Heat alerts sometimes consider humidity, duration or health impacts rather than temperature alone. Listen to local emergency guidance instead of dismissing a warning because the temperature resembles a familiar summer day at home. A dense city, exposed archaeological site, desert excursion and tropical island create very different heat loads. Use the forecast to change the itinerary, not simply the clothing in your suitcase.

    Shift outdoor sightseeing to cooler hours

    Start outdoor activities earlier when conditions permit, then move to indoor museums, a shaded café or your accommodation during the hottest part of the day. Evening outings can work well in some places, but warm nights may not provide meaningful relief. Check attraction opening hours and transport service before assuming a sunrise or late-night schedule is possible.

    Do not schedule the longest uphill walk after a midday queue. Group activities by neighborhood and leave time to stop rather than crisscrossing a city. For example, a morning historic district visit followed by an accessible indoor exhibition may be more pleasant than four exposed landmarks in succession. Our realistic itinerary guide provides a framework for creating breathing room without abandoning what you came to see.

    Choose accommodation for actual cooling, not a vague label

    “Air-conditioned” can mean central cooling, a portable unit in one room or equipment with restricted operating hours. Read recent reviews for comments about temperature and noise, then confirm the room setup. Ask whether fans, shutters, black-out curtains and drinking water are available. For apartment rentals, consider whether top-floor rooms and direct afternoon sunlight cause uncomfortable indoor conditions.

    Route 66 Empty Desert Highway

    Location matters too. A hotel near a shaded transport stop can spare a child or older adult several exhausting walks. Check whether lifts function, whether rooms require stairs and how easy it is to return for a rest. For families, a midday break should be realistically reachable without a lengthy bus journey. Our accommodation comparison guide helps evaluate the room and neighborhood together.

    Plan drinking water and meals without improvisation

    Drink regularly and follow relevant health guidance rather than waiting for severe thirst. Check whether tap water is safe at your destination; otherwise identify reliable supplies or refill points. Carry a reusable bottle where suitable, but avoid assuming every public fountain provides potable water. A long excursion needs adequate water for every traveler, not only for the most active adult.

    Meals and hydration routines can be disrupted by heat and sightseeing. Consider indoor meal breaks with access to clean facilities and time to rest. Anyone on fluid restrictions or medication affecting hydration should follow individualized professional advice. Do not use alcohol as a way to “cool down.” Plan where to obtain water during transfers, not just after arrival at the attraction.

    Adapt the holiday for infants and young children

    Babies and very young children depend on adults to regulate their environment and recognize warning signs. Shade, regular breaks and appropriate clothing matter, and a stroller canopy alone may not prevent dangerous heat buildup. Never leave a child inside a parked car, even briefly. For infants, ask a healthcare professional about age-appropriate feeding and hydration rather than applying adult water advice.

    Seek parks with genuinely shaded areas and nearby restrooms rather than scheduling hours on an exposed beach. Older children may not notice how much heat affects them when excited by activities. Teach them to say when they feel dizzy, unusually tired or unwell. Our toddler holiday guide offers practical routines that can be adjusted for hot weather.

    Include older adults and people with medical needs in planning

    Older travelers may be less able to regulate temperature or notice dehydration, and some medical conditions or prescriptions can increase heat-related risk. Do not make assumptions about an individual’s ability based only on age. Ask what pace, access to cooling and rest schedule they prefer, and arrange the trip accordingly. A short taxi or accessible shuttle may be a sensible alternative to a long walk.

    Before travel, people with health concerns should discuss potential heat exposure and medicines with their clinician. Know where a pharmacy and medical facility are located. If someone becomes confused, collapses or develops other severe symptoms in the heat, seek emergency assistance promptly; do not continue sightseeing. Our travel-after-70 guide emphasizes independence with appropriate comfort planning.

    Be selective about beaches, hikes and outdoor tours

    A coastal breeze can disguise sun exposure, and natural shade may be absent at scenic viewpoints. Evaluate distance, altitude gain, return transport, access to toilets and the possibility of leaving early. Organized excursions should explain water provision, cooling stops and cancellation or modification policies during official heat warnings. A tour that sounds manageable in a description may be unsuitable during a hot spell.

    Route 66 Desert Trading Post

    For hiking, never rely on a single bottle, uncertain spring or hope that a mobile signal will work. Heat, difficult terrain and remote locations can combine to increase risk. If conditions are unsuitable, change the excursion rather than trying to push through for a photograph. Alternative cultural experiences or a different day can preserve the enjoyment of the trip without the same exposure.

    Manage heat during transport and transit

    Airport queues, outdoor platforms and traffic jams can be tiring even when the vehicle itself is cool. Pack water consistent with security rules, refill after screening where possible, and carry lightweight layers for air-conditioned interiors. Before booking a long road journey, consider shade at rest stops, air conditioning and the risk of breakdowns. Do not leave children, dependent adults or animals in a parked vehicle.

    Check whether regional trains and buses offer reliable cooling. A missed connection can mean waiting in direct sunlight at a rural station. Our car-free travel guide is useful for planning backup routes and realistic transfer times. Keep an easy-to-reach supply of essential medication and avoid temperature-sensitive storage problems by following professional instructions.

    Recognize when to stop and seek help

    Heat exhaustion and more serious heat illness can involve symptoms such as weakness, dizziness, nausea or altered mental status. Specific symptoms and actions require authoritative local medical guidance. If someone appears confused, faints or has signs of heatstroke, seek emergency assistance immediately and follow emergency-service advice. Do not attempt to diagnose solely from a travel blog.

    Have the local emergency number saved and know your current address in a form that can be shared with responders. Identify a nearby cool public building and return to accommodation before people become dangerously unwell. If a warning becomes severe, cancelling a nonessential excursion is a responsible decision. Travel insurance may have exclusions for activities or cancellations; check the actual policy before assuming costs will be reimbursed.

    Build a flexible heat-aware daily itinerary

    For a five-day city visit, list your must-see sights and label each as exposed outdoors, partly shaded or indoors. Schedule only one demanding outdoor experience on a typical hot day and reserve flexible slots for weather-sensitive activities. Keep an alternative plan of museums, cultural centers and short shaded walks. Aim for a pleasant trip, not a competition to cover maximum distance.

    Discuss the plan with every traveler, including children old enough to express preferences. People with disabilities may need accessible cooling venues and routes rather than improvised stairs or crowded transport. Pay attention to air quality alerts as well as heat. The most memorable moments may come from an unhurried evening in a neighborhood rather than an exhausting midday dash across the city.

    Frequently asked questions

    Is a hot destination unsafe for everyone?

    Not necessarily. Risk depends on actual conditions, activity, accommodation and personal circumstances. Follow local warnings and adapt plans, especially for those at higher risk from heat.

    Does a stroller sunshade keep a baby cool?

    Shade helps limit direct sun, but some coverings can trap heat and impede airflow. Avoid enclosed hot environments and follow age-specific advice from pediatric health authorities.

    Should older travelers stop traveling in summer?

    No general age cutoff applies. Consider the person’s health, preferences, accessible cooling and itinerary; consult a clinician about individual risks when appropriate.

    Can travel insurance reimburse a cancelled outing during a heatwave?

    Policies differ. Some cover only specific named events or cancellation reasons. Check exclusions and operator conditions before assuming an uncomfortable forecast qualifies for reimbursement.

  • Morocco Sahara in 9 Days: Marrakech, Aït Ben Haddou and Merzouga Without a 3-Day Driving Marathon

    Morocco Sahara in 9 Days: Marrakech, Aït Ben Haddou and Merzouga Without a 3-Day Driving Marathon

    The classic Marrakech-to-Merzouga desert tour is often sold in three days, which is technically possible and usually means very long hours in a minibus. If the Sahara is one of the main reasons for travelling to Morocco, nine days allow the road itself to become part of the trip rather than an obstacle.

    This route gives Marrakech three nights, two nights across the Ouarzazate/Dades corridor, two nights in Merzouga and a final overnight stop before returning or flying onward. The desert receives a full day instead of one sunset, sleep and sunrise before another eight-hour drive.

    The Moroccan National Tourist Office presents Ouarzazate, the Dades valleys and Tinghir as a landscape region in its own right. Its suggested desert route gives roughly 194 km and about 3 hours 45 minutes from Marrakech to the Ouarzazate region, then about 303 km and 4 hours 20 minutes onward toward the Errachidia/Merzouga side—before scenic stops, mountain traffic and breaks are added.

    Quick trip summary

    • 3 nights Marrakech, 2 nights Ouarzazate/Dades corridor, 2 nights Merzouga, 1 return/transfer night, Day 9 departure.
    • Use a reputable driver or tour for the desert road unless you are experienced with Moroccan mountain/desert driving.
    • Sleep two nights in Merzouga.
    • Do not treat Aït Ben Haddou and Dades as roadside photo stops only.
    • Avoid a same-day Merzouga-to-international-flight connection.

    Why this route works

    Marrakech needs several nights before the road trip so the medina, gardens and food are not squeezed around transport.

    The Ouarzazate/Dades section contains kasbahs, valleys and High Atlas approaches that deserve at least two nights.

    Merzouga is one of Morocco’s Sahara gateways and becomes much more rewarding when you have a full day between arrival sunset and departure.

    A realistic itinerary at a glance

    Days Base Main focus
    1–3 Marrakech Medina, food and acclimatisation
    4–5 Ouarzazate / Dades High Atlas crossing, Aït Ben Haddou, valleys and gorges
    6–7 Merzouga Erg Chebbi, desert camp and full desert day
    8 Return corridor / Errachidia or Ouarzazate Break the long return
    9 Departure Marrakech/Fes/Errachidia onward

    Day-by-day plan

    Day 1: Marrakech arrival

    Stay inside or near the medina depending on luggage tolerance and keep the first evening simple. Marrakech intensity plus a flight is enough for one day.

    Day 2: Marrakech medina

    Use a guided historic walk if helpful, then leave time for souks and a long lunch. Do not cram every palace and garden into one day.

    Day 3: Marrakech flexible day

    Choose gardens, food, hammam or another neighbourhood. This buffer means the desert departure tomorrow does not sit directly after a delayed international flight.

    Day 4: Marrakech to Ouarzazate/Aït Ben Haddou

    Cross the High Atlas with a reputable driver, stopping at Aït Ben Haddou and one mountain viewpoint. The official tourism estimate already approaches four hours before stops, so this is a full travel day.

    Day 5: Ouarzazate to Dades/Tinghir corridor

    Use Skoura, Dades Valley, Rose Valley or Todra direction according to the chosen overnight. The official tourism board treats this as a landscape region, not merely a road between Marrakech and the dunes.

    Illustrated Morocco route from Marrakech through the Atlas and Dades area to Merzouga

    Day 6: Continue to Merzouga

    Drive toward Erg Chebbi, arriving with enough time to settle before a camel walk or 4×4 transfer to a desert camp. Do not schedule three additional gorges on the same day.

    Day 7: Full Merzouga day

    Use sunrise only if you want the early start, then return for rest. Spend the day with a village, oasis, guided desert walk, music/cultural experience or simply time among the dunes. A second sunset prevents the desert from becoming a sleepover.

    Day 8: Break the return

    Travel toward Errachidia/Midelt for a Fes direction or back toward Ouarzazate for Marrakech. This is intentionally a positioning night; forcing Merzouga to Marrakech in one push is exactly what the route is designed to avoid.

    Day 9: Departure or onward city

    Complete the return or fly from the most practical airport if schedules fit. Keep any international flight well separated from the long road segment.

    Where to stay and how many hotel changes to make

    In Marrakech, choose medina atmosphere versus vehicle access consciously; a riad deep in narrow lanes is beautiful but luggage transfers need planning.

    In the desert, distinguish between a camp reached by dunes and a hotel/riad on the edge; bathroom, heating/cooling and electricity standards vary widely.

    Hotel geography matters more than a small nightly-price difference. A room that removes a repeated transfer, long walk with luggage or difficult parking problem often adds more value than a prettier property in the wrong place.

    Read recent guest reviews for practical details that promotional photos rarely show: stairs, lift size, road noise, parking, breakfast hours and how far you actually carry luggage from the station, ferry terminal or car park.

    Transport: what is worth planning in advance

    Private or small-group road transport is the easiest solution for a first Sahara route because the driver handles passes, fuel, stops and rural navigation.

    Self-driving is possible for experienced travellers, but avoid night driving and confirm rental/insurance conditions for unpaved access.

    Measure every move door to door rather than by the timetable headline. Checkout, waiting, luggage and the final transfer can turn a short train, road or ferry journey into half a day.

    Save tickets, accommodation addresses and essential timetables offline. Rural roads, islands, mountains and national parks are exactly where mobile coverage or battery life can become least reliable.

    Food and daily rhythm

    Marrakech provides the broadest dining; road days rely more on set lunch stops, guesthouses and camp meals.

    Communicate dietary needs before the desert because remote camps have less flexibility than city restaurants.

    Use meals to control the rhythm of the day. A long regional lunch can be both an experience and a recovery period after museums, hiking, heat, driving or an early start.

    Do not make every meal another attraction. Mix destination restaurants with markets, bakeries, cafés and simple local places so food improves the trip instead of controlling it.

    Families, children and older travellers

    The route can work with children if road days include real stops and the desert camp is selected for comfort, not only atmosphere.

    Older travellers should ask about camel mounting, dune walking, camp toilets and 4×4 access; a camel ride is optional, not required to experience Erg Chebbi.

    For multigenerational travel, the useful pace is the one at which the least mobile member still enjoys the day. That normally produces a better shared trip for everyone.

    When accessibility matters, ask specific questions about steps, surfaces, boat boarding, lifts and vehicle access rather than relying on a generic accessibility label.

    Budget: where the money really goes

    Private drivers and high-comfort desert camps are the major expenses. A cheaper three-day group tour costs less but trades money for many more hours in the vehicle.

    Paying for two desert nights can offer better value than an upgraded camp if the real goal is time in the landscape.

    Compare total trip cost rather than headline room or ticket prices. Parking, taxis, transfers, luggage, park transport and time lost reaching remote accommodation can erase an apparent saving.

    The best splurges usually remove friction: a central room, a direct transfer, a good guide where context matters, or one extra night that prevents an exhausting move.

    Best time to go

    Spring and autumn are easiest for desert travel; summer heat can be extreme and winter nights can be surprisingly cold.

    High Atlas weather can differ sharply from Marrakech and Merzouga, so pack layers even on a desert-focused trip.

    Shoulder season often balances weather, demand and prices well, but ferries, mountain services, wildlife excursions and rural attractions may run less frequently.

    Heat, rain, snow, wind and daylight should change the order of a day. Use the most comfortable hours for exposed outdoor sights and keep easier alternatives available.

    Comfort, accessibility and realistic pacing

    No road day is followed immediately by another pre-dawn departure unless you choose it.

    The full Merzouga day is the key difference between this route and a standard three-day transfer tour.

    Travel fatigue compounds. One difficult transfer can reduce the quality of the following two days, which is why this itinerary avoids one-night bases unless geography genuinely requires them.

    A free half-day is not wasted time. It is insurance for weather, transport disruption, a tired child or a place you discover only after arriving.

    Small decisions that improve the trip

    Give the road two nights before Merzouga

    Aït Ben Haddou, valleys and gorges deserve real time.

    Stay two nights in the desert region

    One sunset is not enough if the Sahara is a trip priority.

    Break the return

    Long-road fatigue is avoidable.

    Use the right camp for the group

    Comfort and access matter more than social-media styling.

    What I would leave out on this length of trip

    Leave Chefchaouen, Atlantic Morocco and the northern cities for separate routes; the site already contains broader Morocco itineraries.

    Skip the three-day Marrakech–Merzouga–Marrakech dash if you have a full nine days available.

    Mistakes that make this trip harder than it needs to be

    • Choosing a tour by the lowest price without checking driving hours.
    • Assuming Marrakech-to-desert is a short transfer.
    • Booking one Merzouga night.
    • Forcing children or older travellers onto camels.
    • Driving mountain roads after dark unnecessarily.
    • Connecting the long desert return directly to an international flight.

    How I would adapt the itinerary

    With six days, use Marrakech plus Ouarzazate/Dades and choose a nearer desert experience instead of Merzouga, or accept one longer return day.

    With twelve days, continue to Fes after Merzouga or add Skoura/Dades nights rather than more roadside stops.

    Before booking

    • Choose reputable driver/tour and inspect the real itinerary.
    • Ask desert camp about bathroom and temperature comfort.
    • Pack layers.
    • Carry cash for rural stops.
    • Protect the onward flight.

    Practical questions

    Is Merzouga worth the long drive?

    Yes if the Sahara is a major priority and you stay long enough; not if you have only a very short Morocco trip.

    Do I need to ride a camel?

    No. 4×4 transfers and walking can provide the desert experience without camel riding.

    How long is the Marrakech–Ouarzazate road?

    The Moroccan tourism office gives roughly 194 km and around 3 hours 45 minutes, before stops and traffic.

    Final thoughts

    The Sahara should not feel like a distant attraction you endure a minibus to reach. The Atlas, kasbahs, valleys and dunes form one journey.

    Nine days allow Marrakech, the southern road and Merzouga to become separate experiences instead of a three-day driving marathon.

    How to keep this itinerary resilient

    Mountain weather and roadworks can slow the Atlas crossing, so never schedule a fixed desert activity too close to the expected arrival time.

    Keep the return night flexible enough to choose Marrakech, Errachidia or another logical hub according to your onward ticket.

  • Malta in 7 Days: Valletta, Mdina and Gozo Without Renting a Car

    Malta in 7 Days: Valletta, Mdina and Gozo Without Renting a Car

    Malta looks tiny enough to cross in an afternoon. That is true geographically and misleading practically. Buses, ferry connections, summer traffic and the temptation to visit every historic site can make a seven-day holiday feel much busier than the map suggests.

    This itinerary uses only two bases: the Valletta area for Malta’s main island and Gozo for a slower final section. Mdina, the Three Cities and selected coastal stops become day trips rather than reasons to repack.

    The official Visit Malta tourism site emphasises Malta’s mix of history, sea, food, Gozo and cultural experiences. That mix is exactly why a balanced week should not be built entirely around beaches or entirely around monuments.

    Quick trip summary

    • 4 nights around Valletta/Sliema, 2 nights Gozo, final departure day.
    • Use buses and ferries rather than renting a car unless mobility or family needs strongly favour one.
    • Visit Mdina early or later in the day.
    • Sleep on Gozo instead of seeing it only through a rushed day tour.
    • Keep Comino optional and weather-dependent.

    Why this route works

    Valletta is the best cultural anchor because it is compact, ferry-connected and full of museums, churches and evening atmosphere.

    Mdina and Rabat work naturally together and do not need a separate hotel. The Three Cities are also close enough for a half or full day from Valletta.

    Gozo deserves at least two nights because its appeal is slower: villages, coast, walking and a different evening rhythm after day visitors leave.

    A realistic itinerary at a glance

    Days Base Main focus
    1–4 Valletta / harbour area Valletta, Three Cities, Mdina and coast
    5–6 Gozo Victoria, coast and villages
    7 Departure Return to main island with buffer

    Day-by-day plan

    Day 1: Valletta arrival

    Walk Republic Street, the waterfront edges and one viewpoint rather than starting with multiple ticketed interiors. Valletta’s slopes are short but cumulative.

    Day 2: Valletta properly

    Choose St John’s Co-Cathedral and one major museum or historic interior, then leave time for Upper Barrakka, cafés and the city after the daytime crowds thin.

    Day 3: Three Cities

    Use the harbour ferry where convenient and explore Birgu slowly. Forts, waterfronts and lanes can fill most of the day without crossing the island.

    Day 4: Mdina and Rabat

    Travel inland early. Mdina is small but benefits from unhurried walking, while Rabat’s sites and lunch options make the outing more substantial. Return before the evening commute becomes tiring.

    Day 5: Move to Gozo

    Take the ferry, check in and keep the first afternoon for Victoria/Citadel or a nearby village. Do not attach a full island tour to the transfer day.

    Day 6: Gozo coast day

    Choose a focused loop based on weather: one coastal area, a village, perhaps a boat if conditions are good. Gozo is not improved by trying to stop at every viewpoint.

    Day 7: Return and depart

    Give the ferry and onward airport transfer a wide buffer. If the flight is early, consider returning to the main island the night before.

    Where to stay and how many hotel changes to make

    Valletta is atmospheric but can be expensive and hilly; Sliema or another harbour-connected base can be practical for families.

    On Gozo, Victoria is easiest without a car, while a coastal village is better if relaxation matters more than bus connectivity.

    Historic Maltese buildings can have narrow stairs and small lifts, so accessibility questions should be specific.

    Location matters more than a small difference in room price because a badly placed hotel can turn every meal and attraction into another transfer. Check the walking route from the station or drop-off point, not only the straight-line distance shown on the booking map.

    In historic centres, charm can come with stairs, small lifts, street noise and difficult taxi access. Recent guest reviews often reveal these details better than the room description, especially for families, older travellers and anyone carrying large luggage.

    Transport: what is worth planning in advance

    Public buses cover the islands extensively, but journey times can stretch in traffic; avoid planning back-to-back timed entries across Malta.

    Harbour ferries are both practical transport and a sightseeing experience.

    The Malta–Gozo connection is straightforward, but always confirm the current ferry option and terminal that fits your route.

    Think door to door rather than station to station. Checkout, the trip to the terminal, waiting time, luggage and the final ride to the next hotel can turn a short headline journey into half a travel day.

    Book fixed tickets early only when the savings justify losing flexibility. On days that depend on weather, a late-running tour or a long international arrival, flexibility can be worth more than the cheapest fare.

    Food and daily rhythm

    Pastizzi make a useful snack, not a balanced meal plan. Use bakeries, fish restaurants and Maltese dishes as part of the day rather than chasing a viral food list.

    On Gozo, evening dining can be quieter and more seasonal, so check opening days if staying outside Victoria.

    Use food to shape the pace of the day. A long regional lunch or market stop can be an experience in its own right and often gives the group the rest needed before another museum, fortress or evening walk.

    Do not force every meal to be famous or traditional. Mixing local specialties with simple breakfasts and familiar food is especially sensible on hot days, after long drives or when travelling with children.

    Families, children and older travellers

    Short ferry rides and fortified cities work well with children because the day changes format frequently.

    Summer heat can make exposed stone streets demanding for young children and older travellers.

    A taxi for one awkward cross-island leg can be better value than forcing a tired group through two bus changes.

    For multigenerational travel, plan around the slowest comfortable pace rather than the maximum that the most energetic person can achieve. This produces better shared days and usually fewer last-minute taxi rides.

    Give children and teenagers variety: a fortress after a museum, a beach after archaeology, a boat after a city walk. Changing the format is often more useful than adding another headline attraction.

    Budget: where the money really goes

    Malta can be moderate compared with some Mediterranean islands, but central summer accommodation and boat trips raise the total quickly.

    Public transport reduces car and parking costs, while occasional ride-hailing can still fit comfortably into the budget.

    Compare total trip cost, not only room rates and headline transport fares. Parking, luggage, transfers, mandatory fees and the time lost reaching a remote hotel can erase apparent savings.

    The best upgrades usually remove friction: a central hotel, a private transfer on the hardest leg, an experienced guide where context matters, or a direct connection that saves a full afternoon.

    Best time to go

    Spring and autumn are excellent for walking and heritage sightseeing.

    Summer is best for swimming but requires heat management and more patience with traffic and crowds.

    Shoulder season often gives the best balance between weather, room availability and crowd levels, but seasonal transport and attraction hours may be reduced. Always check the exact month rather than relying on a generic ‘best time’ label.

    Heat, rain, wind and short daylight change what a realistic sightseeing day looks like. Move outdoor priorities to the best part of the day and protect indoor alternatives instead of following the same schedule in every season.

    Comfort, accessibility and realistic pacing

    Use early mornings for exposed historic areas and save shaded interiors or sea time for hotter hours.

    Two bases are enough for a week; a third hotel adds very little because Malta’s distances are short.

    Travel fatigue compounds. A difficult transfer on Day 3 can make Days 4 and 5 worse as well, which is why this itinerary avoids one-night stops unless they solve a genuine geographical problem.

    A free half-day is not wasted time. It is insurance for weather, a delayed transfer, laundry, a child who needs a quiet afternoon or an attraction you discover only after arriving.

    Small decisions that improve the trip

    Sleep on Gozo

    The island feels different after excursion traffic leaves.

    Keep Comino optional

    Weather and crowd conditions determine whether a boat day improves the trip.

    Do not rent a car automatically

    Driving on the left, parking and narrow roads can add stress when buses, ferries and taxis already cover this route.

    What I would leave out on this length of trip

    Leave a full diving programme or multiple beach days for a more sea-focused trip.

    Skip trying to see every megalithic temple, fort and church in one week.

    Mistakes that make this trip harder than it needs to be

    • Treating Malta as small enough to cross repeatedly every day.
    • Doing Gozo only as a rushed coach tour.
    • Booking timed attractions on opposite sides of the island.
    • Underestimating summer heat on limestone streets.
    • Choosing a Valletta hotel without checking stairs.
    • Connecting Gozo directly to a tight flight.

    How I would adapt the itinerary

    With four days, stay on the main island and make Gozo a carefully chosen day trip.

    With ten days, add more Gozo time and one dedicated beach or archaeology day.

    Before booking

    • Check current ferry information.
    • Map bus travel times, not only distances.
    • Verify hotel lift access.
    • Keep boat plans weather-flexible.
    • Return from Gozo early enough for the flight.

    Practical questions

    Do I need a car in Malta?

    No for this itinerary. A car can help specific mobility needs or remote exploration, but it is not required.

    Valletta or Sliema as a base?

    Valletta wins for atmosphere and history; Sliema can be easier for hotels, flat waterfront walking and some transport connections.

    Is Gozo worth two nights?

    Yes. Staying overnight changes it from a sightseeing circuit into a slower island experience.

    Final thoughts

    A week in Malta works best when the country’s small size reduces hotel changes instead of increasing daily mileage.

    Four nights around the Grand Harbour and two on Gozo create enough history, sea and local life for a varied first trip.

  • Architecture-Focused City Breaks: Read a Destination Through Its Buildings

    Architecture-Focused City Breaks: Read a Destination Through Its Buildings

    Architecture can make an ordinary walk feel like a journey through centuries. A railway station may reveal a period of industrial ambition; a neighborhood of apartment blocks may show how a city responded to population growth; a modern public library might express different ideas about space, democracy and civic life. You do not need a degree in design to enjoy an architecture-focused city break. The key is to look beyond isolated iconic buildings and explore how streets, public spaces and everyday homes work together.

    Quick planning reference

    DecisionWhat to checkUseful action
    ThemePeriod, style or urban questionSelect coherent neighborhoods
    EntryTimed tours and security rulesReserve key interiors first
    ContextResidents, conservation and adaptationRead locally grounded history

    Start with a theme rather than a list of landmarks

    Select a period or question that genuinely interests you: medieval street patterns, Art Deco, modernist housing, colonial-era urban development, adaptive reuse of industrial buildings or contemporary sustainable design. This keeps the itinerary coherent. A city can contain examples of several eras, but trying to visit every famous building in a single day often results in long transfers and shallow impressions. Three distinct places with time to observe may be more rewarding than twelve hurried exterior photographs.

    For a first architecture weekend, one theme could be the relationship between public buildings and surrounding neighborhoods. Visit a major library, a market hall and a transport hub, noting how people use each place. Alternatively, explore an old industrial quarter transformed into residences and cultural institutions. Read a local heritage organization’s interpretation before drawing conclusions; historical styles and dates are frequently oversimplified in travel marketing.

    Read buildings in their urban context

    A façade is only one part of architecture. Notice orientation, shade, public seating, pedestrian crossings and the relationship between a building and its street. A striking museum may be hard to approach on foot; a modest courtyard may be loved because it provides cool shelter and social space. UNESCO’s historic urban landscape approach encourages looking at heritage alongside everyday city life and its wider environmental and cultural setting.

    Ask which communities built, maintained and used a place, and whether those communities still have a voice in its future. Old neighborhoods can be charming and vulnerable to displacement at the same time. Avoid photographing residents’ homes as though they are museum exhibits. A respectful architectural itinerary makes space for local businesses, active public institutions and the ordinary users of the city.

    Choose destinations for contrasts

    Cities such as Barcelona, Chicago, Rotterdam, Brasília, Mumbai, Kyoto and Porto can illustrate very different architectural stories. Their suitability depends on your interests, not an objective ranking. Barcelona offers layered urban design; Chicago is associated with influential tall-building traditions; Rotterdam has significant modern reconstruction; Brasília is known for planned monumental urbanism. These examples are starting points, and each requires research into access, current opening schedules and neighborhood context.

    The most memorable contrasts can be found within one destination. A carefully restored historic quarter may sit near innovative social housing, an industrial waterfront or a new public square. Instead of treating one style as superior, ask what problem each building was intended to solve and how well it serves people today. Architecture is more interesting when it includes failures, adaptations and changes of use alongside celebrated masterpieces.

    Chicago Cloud Gate With Historic Buildings

    Use guided walks intelligently

    A well-qualified local guide can explain urban planning decisions, building materials and difficult historical contexts. Ask what the walk covers, how much of it is outdoors, whether any buildings are entered and whether photography is permitted. A tour advertised as ‘inside the secret city’ should be evaluated carefully; restricted interiors may be inaccessible for reasons of privacy, conservation or safety. Never accept trespassing as proof that a guide offers a special experience.

    Some travelers prefer an audio guide or a self-directed map. These can be excellent if routes are verified and the city feels safe. Choose a manageable district and allow pauses for sketching or reading. For visitors with mobility limitations, request step-free routes and exact walking distance. A walking tour may be labelled accessible while including uneven historic paving or long standing periods; advance details matter more than general promises.

    Plan interiors, tickets and photography

    Iconic buildings may be functioning courts, offices, private residences, places of worship or universities. Public opening hours and permitted areas are often limited. Check whether tours require advance reservations, identification, security screening or dress standards. An exterior can be enjoyed freely in many cases, but do not assume entry simply because the façade is famous. Some architectural interiors prohibit tripods, flashes or photography altogether.

    If your itinerary depends on two major ticketed interiors, reserve those first, then arrange nearby outdoor stops around them. Avoid booking timed slots on opposite sides of a city without realistic travel buffers. When a famous building is closed, a neighborhood walk or public architecture exhibition can save the day. Good itinerary design values the story of the city, not just the number of interiors entered.

    See architecture through different seasons and light

    Low winter light can emphasize building forms but offers fewer daylight hours. Summer gives time for long walks, while heat and reflected sun can make exposed plazas uncomfortable. Rain can reveal urban drainage and the relationship between covered and open spaces, but it also creates slippery surfaces. Check temporary scaffolding and restoration notices for a building you hope to photograph. Construction is a normal part of city life and preservation.

    A tour boat on the Chicago River between high-rise buildings

    For photography, look at how the building relates to people rather than waiting indefinitely for an empty street. Respect privacy when shooting residential windows, religious services and school areas. Drones may be restricted near public buildings or dense neighborhoods. A small notebook with sketches, materials and observations is a useful alternative to collecting hundreds of identical façade photographs.

    Make the itinerary work for every age

    Young children often respond better to playful observations—counting arches, spotting shapes and comparing bridges—than long explanations of architectural movements. Offer a short route and a nearby park. Teenagers may enjoy contemporary libraries, stadium architecture or digital design exhibits where visitors can build models. For adults interested in history, a local archive or guided conservation tour may add depth to ordinary sightseeing.

    Older visitors benefit from benches, toilets and reliable transport between districts. Someone with a wheelchair may be able to enjoy striking exteriors and public squares even when a protected historic interior has unavoidable access barriers, but this should be checked individually. For a mixed-age group, choose one principal visit per half day and let participants opt out of longer walking segments without feeling they have missed the whole trip.

    Calculate cost and travel time honestly

    Architecture is often a relatively economical travel theme because many important exterior spaces are free to view. Costs increase with specialist guided tours, museum entry, transport and premium interiors. Compare the complete experience, not just ticket prices. A central hotel can be worth more than a cheaper distant option if you plan early morning walks and evening photography, but accommodation cost needs to be balanced against your overall budget.

    Maine Town Main Street With Historic Buildings

    Public transport may help connect architectural districts, yet stations can have multiple exits and confusing pedestrian access. Save a route for each day and note the actual entrance to ticketed buildings. When using a city pass, check whether the relevant architecture tours are included or merely discounted. Passes should be evaluated against your realistic number of visits, not their long marketing list.

    Design a meaningful three-day plan

    On day one, take an orientation walk through the historic core and visit one public building. On day two, explore a contrasting district shaped by industry, modernization or redevelopment, perhaps with a local guide. On day three, tour an interior you particularly care about and leave an hour for a café and notes. The itinerary can be compressed to two days by selecting only one thematic district and one interior visit.

    Consider adding food markets and local transport to observe architecture in use. A great market building reveals the practical needs of vendors and residents, while a railway station tells stories through circulation, signs and platforms. The aim is to understand how design interacts with daily life. Avoid a schedule built entirely around famous monuments that visitors enter for five minutes before moving on.

    Avoid superficial claims about local history

    Architectural travel can involve uncomfortable subjects such as forced labor, segregation, demolition and displacement. A magnificent palace or planned district may reflect unequal power. Read material from respected museums, heritage organizations and local historians before celebrating a structure without context. Presenting complicated histories honestly can deepen admiration for craftsmanship without erasing the experiences of people affected by the building’s creation.

    Modern architecture may also provoke disagreement. A structure admired by design critics might be unpopular with residents who experience noise, expense or restricted public space. Listen to different perspectives. Support venues that make interpretation accessible to communities instead of reducing every city to a competition for the most unusual skyline.

    Frequently asked questions

    Do I need architectural knowledge to enjoy this kind of trip?

    No. Start with one theme, observe materials and public spaces, and use accessible interpretation or a beginner-friendly guide.

    Can I visit famous building interiors without booking?

    Sometimes, but many require reservations or restrict access. Verify each building’s official visitor arrangements rather than trusting old photos.

    Are architecture trips affordable?

    They can be, because exterior routes are often free. Budget separately for specialist interiors, guided walks and transport.

    Is architectural sightseeing suitable for children?

    Yes, especially with playful activities, short distances and regular breaks. Long technical tours may not suit very young children.

    What if a landmark is covered in scaffolding?

    Treat the city as a wider story. Explore an alternative neighborhood, museum or public space; restoration is part of the life of a building.

    An architecture trip is at its best when it helps you see relationships: between streets and homes, design and climate, public ambition and everyday use. Travel slowly enough to notice those connections, and familiar cities can begin to look entirely new.

    Official and specialist references

    Rules and availability may change. Check current official destination and provider information before booking or making health-related decisions.